Tuesday, 24 February 2015

Zaption Woo-hoo!


Great new tool discovered for making Youtube videos more interactive. Their tagline is "don't just watch. Learn." Who are they? zaption.com

Get started and create an account using your Google login or a different one.

The video tour that pops up is actually really useful so watch it and learn!

Once you are through the tour then you'll be ready to start creating.


Click on New Tour.


Add a video; you can upload or insert a link from youtube.


Trim the beginning and end by clicking on the little scissor snip tool.


The way you do this is by dragging the blue circle (not orange triangle) to where you want to trim and then press save.


Play the video and decide where you could pause for a question!


Questions come in many forms - the opportunity to write a short answer, pick a multi choice or check boxes to tick. While writing short answers may help students achieve deeper learning, once they submit their answer there is no way to see what they have written without paying for the upgrade of zaption. 

I've tried to get around this by asking students to screenshot what they write if it's a short answer question and screenshotting whether their answers were correct or incorrect if it is multi choice or checkboxes!


Drag the style of question you want onto the video. Click on the boxes to write the question and provide options for multi choice or checkbox questions.


Select which answer is correct or incorrect by clicking on the little orange +'s. You can also write why the answer is correct or incorrect, which students will see depending on what they wrote.

Again, if you pay for the upgrade there is a great option to send students back to a certain part of the video if they pick an incorrect option.


Once your zaption video tour is complete and full of questions, click publish! 


When it's published it looks like this. Now.. how to share?!


Click the little dropdown arrow and select share.
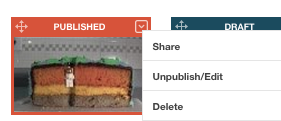


You can add a link by copying the link, or embed the iframe code in an embed gadget on your site, so students can complete the zaption tour without leaving your class site.

If you don't know how to use an embed gadget and modify the size to suit the iframe width and height then you may have to search for one of my previous blog posts.


Happy zapping :) 


Monday, 26 January 2015

A Reminder To Self: Useful Sites and Tools

Online Tools for Education

This post is about some of the online tools that I found useful last year...
I wanted to describe them all in one place (with links) so I could return at a later date if I was ever stuck for a way to make learning online more creative for my students.  
Most of these tools are easy to use, and could just as easily be used by students. They could create something for themselves, or something to share with their peers (or wider audience) based on what they have learned. 
I'm sure that I have missed a lot of great tools! It would be really helpful if anyone could post sites that I have missed in the comments section below to help build up an even bigger inventory of resources to share. 

VOCAROO - Uneditted voice recordings. Could be used to remind students about homework and school events etc. A quick and easy way to communicate with students at home. Gives you an embed code to put on your site or blog.
PADLET - A virtual post-it wall. Create a padlet, double-click to make a posting with instructions or an example. This can also give you an embed code to insert into your site, and students can interact with it without leaving your site.
INSTA-GROK – good for gathering information. Type in a question and it displays information as an interactive spiderweb. Hover mouse over it to see information expanded. You can adjust the slider at the top from “brand new” to “expert” to change the complexity of the information displayed. I personally find this confusing but other learners may enjoy the links and visual nature of the spiderweb.
THINGLINK – is extremely simple. Use any image from the web and add interactive links to it that will lead students off on an adventure of their choosing. Provides an embed code for your site as well.
LINOIT - similar to padlet but you have more control over the background colour. Doesn't appear to have any embed codes available.
WIKISPACES - you may have to fully commit to wikispaces as your organisational platform (like EDMODO) so students know to regularly return to it. Or just use it for a short time to run and monitor a discussion.
GO!ANIMATE – used to make little animated videos or moving comic strips. I would now only use this for a short home-learning summary task as it can be quite an involved and time-consuming process.
ABCYA ANIMATE - similar to the old Paint with brushes and pencils of varying size and colour. The tutorial is clear. It is easy to draw with and change. You can't change the speed of presentation of the animation and you can't embed it but you can export the final product as a gif and then upload it.
LEARNIST – this site was a little tricky to get into. You can create a 'board' and then add up to 5 articles, videos, or images, along with a heading and description for each. You need to add them one at a time, finish writing everything, and then the final step is to rearrange everything into the order you want students to meet the information. There is an embed code but it doesn't appear to work in my site; instead you could share it on Google+.
PINTEREST - create 'boards' for concepts and search for 'pins' to add to it. Easy to collate ideas in one place. Can't embed it but can share it in other ways. 
SCOOP IT – similar to learnist but looks more like a facebook feed. You can collect and collate videos and articles, and write a description for each one much the same as learnist. However I think it would be quite nice if students could intersperse these with posts of their reflections on each one, kind of like 'status updates' on Facebook.
EDUCREATIONS – started as a digital whiteboard but has since been upgraded. Register as a teacher, set up a class, get a code and start to create lessons. Insert a picture while annotating it and talking, and it saves it as a video.
EDMODO – learning community that looks like Facebook. Access to the class is code protected, and because it is like Facebook it is pretty quick and easy to use. It has folders to drop work into, powerpoints, and you can import from learnit and scoopit etc. Useful for handing in work and marking online, especially for setting deadlines with shutoffs. You can also run quizzes and polls through it.
PEERWISE – this site is run by the University of Auckland. Log in, create a class, and invite students to join by importing their emails from KAMAR or teacher dashboard. IT IS AWESOME! Students create multiple choice questions, answer their peers questions, and can also provide their peers feedback on the difficulty or accuracy of their questions. They earn badges by asking and answering more questions, or providing more feedback.
PREZI – like a cool, moving powerpoint online. Easy to use and many students have experience with it before. You can also easily embed these onto your sites.
DVOLVER MOVIEMAKER - the easiest site for animations, as it has turned the process into 6 multi-choice steps, e.g. choose the background, choose the character, type some text.. No ability to embed or share though, aside from email. Therefore may just be good as a home-learning task or exit ticket.

SOCRATIVE - log in as a teacher to create a quiz, ask a quick question, make an exit ticket or have a SPACE RACE! I like the space race because when students log into the room they are randomly assigned to a team with others in the class. Then students answer the questions you have created, and whenever they get them right they help their teams' space rocket to blast closer to the finish line!

ACTIVELY LEARN - a close reading tool. Log in, create a class and walk through some very clear tutorials. Then chose some readings, set a task or set an assignment. You can search through content (short articles, longer stories, etc) and when you find ones that you like you can send them to your 'workspace.' Sometimes articles that you select will have assignments attached to them that other teachers have created for it, and you can look through them and select one of them too if you'd like. Once it's in your workspace you can add questions (multi-choice or short answer) for students to answer as an assignment. You can also choose whether to attach multimedia to your assignment.

QUIZLET - online flashcards! And not only that, you can create classes, get students to log in and then keep track of the high scores for two games at the end of the quizlet. Students need to learn the words and definitions to get a really good score. The leaderboard is public within your class, so students can see what their friends are scoring. Can get quite competitive and many students have gone home to continue playing.

KAHOOT - click this link to be taken to the teacher login where you can create your own quiz (or select from existing ones). You will need to go to kahoot.it when you want your class to play. This is fantastic for revision and students appear to love it! I wonder if it also has something to do with the dramatic background music while they're playing, and the public scoreboards again at the end of each question.

INFOGR.AM - helps you to create infographics using templates. Only appears to give you 5 templates with identical layout, just different colours. You need to adjust the graphs using your own data. Good if you have 1 set of data or 1 graph you want students to present and explain. Probably better for maths or science than anything else.

PIKTOCHART - I love piktochart. It's very intuitive to use and has a whole lot of different templates (infographic, report, chart and presentation), and if you scroll down there are so many themes within them to chose from. After that, just double click to alter or delete any of the text or images, and drag and drop new ones. Great for student creations.

CANVA - similar to piktochart and just as intuitive. Canva has images that you need to pay to download though, although you can still add them to your poster or infographic (they will just have faint lines and the word Canva across them).

MOVENOTE - links really well with all of our Googly docs and presentations. Open movenote, select which docs or slides you want to talk about, then press record. It will film you talking (so students can see your face) as you click through the different things. It will also show where your mouse is so you can circle around what you're talking about. However it appears to only be shareable via Gmail, not embedded anywhere.

QR READER - downloaded onto phones.. it can be fun to send students on a mission to find and scan different QR codes. This app was being used a lot in Pt England school last year, with the 5 year old iPad class!

COOL TEXT - great for making buttons for your site and simple to use; select the font style that you want, type what you want on the button, and screenshot!

POWTOON - presentations or animation videos. Free signup. Not too bad to manipulate, much simpler than GoAnimate! and it provides an embed code for sites.

PICMONKEY - upload a photo or screenshot and then add text (great fonts) or little images such as blog critters or ladybugs.. I use this to make pretty buttons for my sites.

Thursday, 11 September 2014

Students Becoming the Teacher

Yesterday at the end of 9PLa's Science class Gustavo and Rongo showed me how to make a gif from a youtube video.  

Rongo had been using the gif as the background of a Google Presentation, and it looked really, really cool! 

I asked the boys if they could make a set of instructions to share how to do this, so here they are:


HOW TO MAKE A GIF - BY GUSTAVO


Step 1.

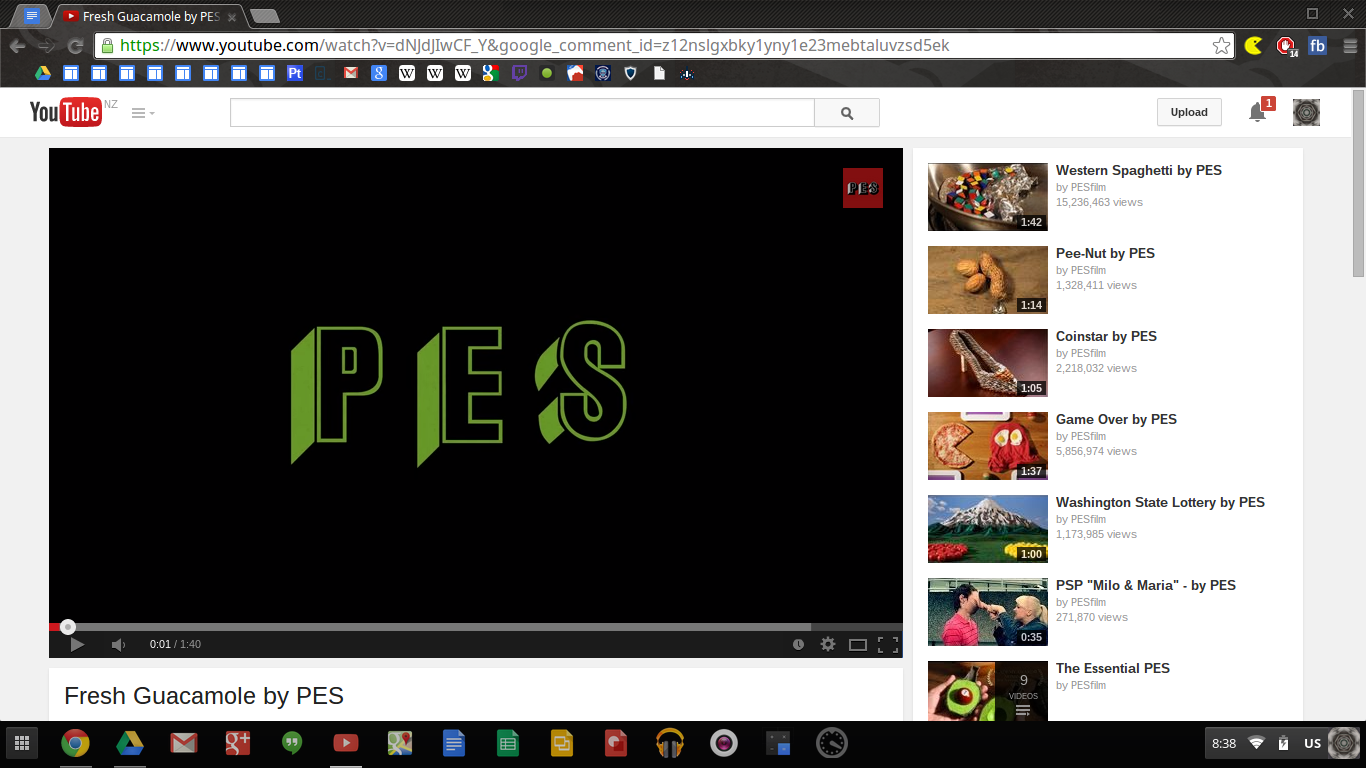
Find a video on YouTube that you would like to convert into a gif.

Screenshot 2014-09-11 at 8.38.05 PM.png


Step 2.

Insert these three letters (gif) after the www. in the URL

Screenshot 2014-09-11 at 12.34.06 PM.png


Step 3.

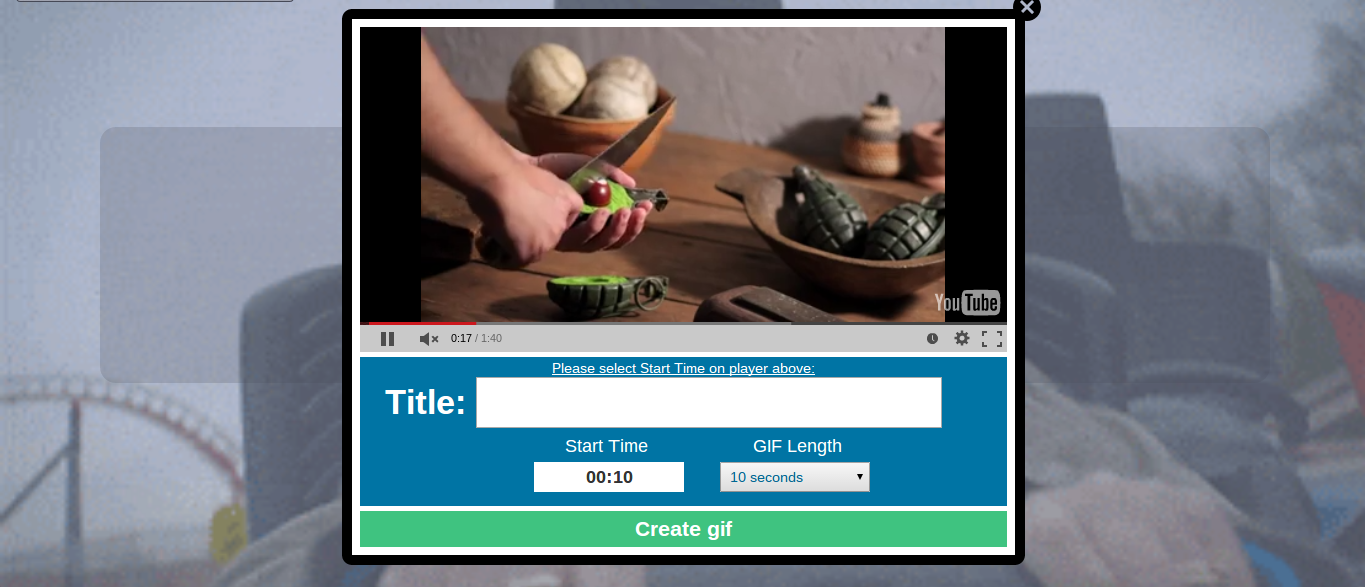
Pick a start time on the video for the gif you are creating

Screenshot 2014-09-11 at 8.46.58 PM.png

LIke this:

Screenshot 2014-09-11 at 8.51.05 PM.png


Step 4.

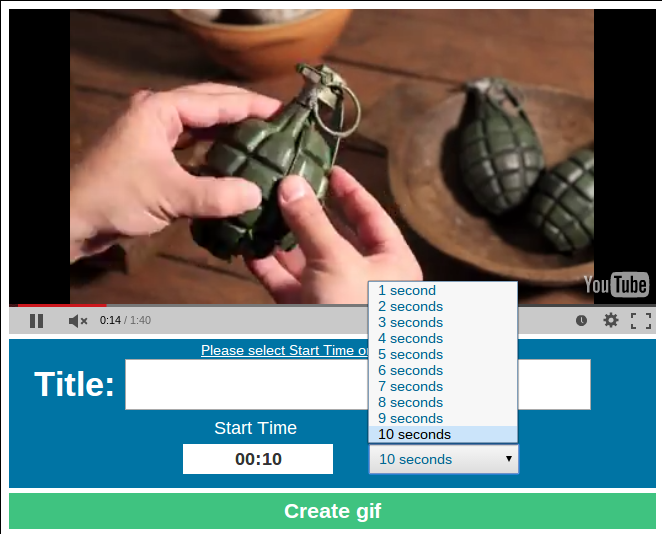
Set a time duration for your video.

Screenshot 2014-09-11 at 8.53.08 PM.png


Step 5.

Create gif.


Outcome:

Fresh gwuac.gif


Saturday, 30 August 2014

Website Layout Success But Problems Embedding Prezis

I've just finished wrestling with a new website for the Year 11 Ecosystems topic that is beginning in a weeks time. After about 4 full weekend days of creating resources, uploading, fiddling with annoying layout issues and creating buttons that are at least a similar size to one another I'm finally happy with how it looks


Along the way I discovered that I don't know how to embed Prezi presentations, so to get around that I tried using Quicktime screen recordings and publishing them through iMovie and Youtube. It worked fairly well (but took a while), and another limitation is that students will need to pause the video if they want to read slower or read again, rather than clicking through a Prezi at their own speed. 

If someone knows how to embed a Prezi then I would be very happy to find out! 

I also found out that you can put tables within tables to help with the layout, and also how important it is to not turn the tables invisible until you're completely done with moving them around.

To make buttons of a similar size I created a background pattern using colorlovers, took a screenshot that was the size of the button I wanted, and then added text to that screenshot in picmonkey. It's taken me about 5 different websites to realise that if I just take a small (button-sized) original screenshot from colorlovers, then I can just take a screenshot of that full size when I'm finished in picmonkey, rather than guessing at how large I should drag the final screenshot.

Now I'm looking forward to seeing how the Year 11's react to the site and the work!

Monday, 11 August 2014

New Tools, Games... Music? in Class

For the last two days I've been experimenting with some different tools and ideas that I haven't regularly used before.


The first was Class Dojo, and it appears to be a hit!  Students compete with each other to earn the different Dojo Points - Starting the Do Now, Working Hard, Helping Others, or being On Task.  Now that I have set up classes online I can wander around holding my cellphone, awarding students points for great work.


 I know that I need to DO something with those points soon though! I have a store of prizes in my office that I need to find time to wrap in newspaper - perhaps the person with the most points each week can do a lucky dip prize draw on Friday! I think it might be a good idea to reset the points at the end of each week and give everyone a clean slate and even footing again, ready for a new week of hard work.


Today I also trialled Socrative Space Race. The first thing I had to do was sign up with school email and create my own quiz questions. Then I could choose whether to run the quiz as Quiz, Quick Question, Space Race or Exit Ticket.

If you select Space Race, you get to choose how many teams you want the students to be randomly assigned into. Socrative gives you a room number (my Chemistry Quiz is in Room 688040, as you can see below).  When students come to play all they need to do is enter that room number and wait for the teacher to click 'Start Activity' once everyone is ready. Then they enter their names and answer questions correctly to help their space ship blast as far as they can!


Something else I have been trying a little is using music in class.  Last week I played 2 minutes of Pharrell's song "Happy" while one of my classes packed up after a messy Elephants Toothpaste experiment. Before the music came on they were dragging their feet a little, but with the upbeat song playing, clean-up became a breeze! I will definitely play music during pack-up again, but I need to make sure the lyrics are clean and wholesome! Perhaps this can be a weekend project for me, compiling a list of usable, upbeat songs for clean-up time.

In a similar vein, today with one of my classes I played Motzart during the Do Now. I think that it settled them some, but I need to repeat this experiment and observe the outcome again!  Some students requested we let the song play on beyond the Do Now, others didn't enjoy it as much. 


I also had a go using movement to help another class remember a concept they have been struggling with; the difference between reactants and products. I got this idea from observing a wonderful maths teacher in my school - she taught her class a rhyme with actions to help her them remember a division concept!

We constructed a rhyme together - "reactants are ingredients you need at the start, products are what you see at the end, made of new parts" (we toyed with the lyrics "like a piece of art," but decided it wasn't as good) - and then I made up a few actions to go with the lyrics.  As we practiced it together some moves were altered (my original action for "new parts" was not specific or cool enough to start with) and I gradually rubbed words off the board until everyone could remember the actions and rhyme without reading the words.

After a few rounds of this I thought we had finished so I went to move on to the next activity when a student said "we should try it without you Miss," which I thought was a GREAT idea! So everyone did it one more time without me. We will see tomorrow whether this helped the class remember the difference between reactants and products! 


For some summarising activities recently I've been using Canva.com to create some really visually appealing (if I may say so myself) infographics. They are incredibly easy to make, by dragging and dropping different components and double-clicking on any text you want to change. By downloading or taking screenshots of the canva creations I've been able to put them into Google Drawings and add text boxes over the top for students to write their observations or summaries into.  Check out the image below to see how Caroline shared her understanding of Gas Tests:


The next step will be for students to create their own infographic, using either canva.com or infogr.am or piktochart.  I think I will try this with PLa first, as they all have working netbooks.  I could also envision maths teachers using infogr.am, and next year I would love to get some seniors to make summaries of biological concepts with Piktochart, perhaps like this one:


Sunday, 27 July 2014

How to Make Groups in Gmail

Sometimes I need to quickly push work out to students, and there are two ways I know to do this (aside from having it available on class sites). 

The first is to use the 'Smart Copy' on Teacher Dashboard, and the second is to create a group on Gmail. I only just learned how to do the second, so I thought I'd make this post!


In Teacher Dashboard each year level is called a 'Class.' Unfortunately, I teach three different year 9 classes who are in the same year level, and they are all mashed together in Teacher Dashboard as one huge year 9 'Class.' 

This meant I had to separate the giant Year 9 'Class' into their actual classes by assigning each their own colour. You can do this by clicking on the squares next to students' names and giving them a colour. PLa is blue for me, PTt is yellow and RTd is orange. You will need to do this too before you can send a smart-copy to each class individually, or if you are lucky, you may just have 1 class per year level!


When you're done you'll be able to use smart copy and send it to just one class.  The 'smart copy' button is that tiny little button on the left hand side under 'Dashboard.' It looks like two teeny, tiny bits of paper. Click on it. 


Once you click on it, this will pop up. If you have the work to push out then select 'use an existing document,' and then select which doc (or form, or spreadsheet, or drawing, or presentation) you want. 


Find the document that you want to share. Select it.


Choose what kind of sharing you want to do. If you select to 'copy' then each student will get a copy of the doc in their own folder, ready to use. 


Next up is a neat option to add the students' name to their doc; all you have to do is type %F at the start of the document name, and it will automatically put their own name in the title in their folder! Smart :)


Ahh, finally, now we are up to the stage of selecting which students to share the document with. I have to select by group, or else the work will go to all three of my Year 9 classes, who are all quite different and work at different speeds. You might be able to just share with a class, if you only have 1 in each year level. 


Make your last selection, and then you will be able to share it! 


The other way that I just found to do this is to create a group in Gmail. This is handy in case you quickly need to contact a class as well; to remind them about homework, to arrange a catch-up session, for notices about permission slips, or share work etc etc. 


In gmail, click on 'Mail' and select 'contacts.' 


Once you arrive at the new screen click on the button with a little person with a + next to them, and begin typing the names or emails of all the people you want to add to the mailing group. The names and emails will automatically separate, and you can add more than one person at a time. 


Once you have everyone you want, click 'add.' These people will now show up in your list of contacts below.


Scroll through the list and tick the names of everyone you just added, then return to the top of the screen to where there is a little group of people. Click on that and from the drop-down menu click on 'create new.' 


Type the name of the new group.


Don't forget to click on 'apply' or no one will be added to your new group. 


Now, when you want to send an email to a group of people you can just type the name of the group, rather than add their names individually. 


Thursday, 24 July 2014

Onetab from Google App Store

Here is a handy little app to add to your toolbar! 

If you are like me and you have spent tens of minutes in lessons trying to direct students to open the right activity, navigate to a quiz, and finding web pages, here is the app for you!

It is called onetab, and what it does is collate all the tabs you have open into one webpage. So all you have to do before a lesson is open up all the things you want students to have open during your lesson, hit onetab, and send them the link created!

Here's how to install and use it:


First, go to the chrome apps site, and click on the store icon.


Use the search box to find onetab.


It popped up at the bottom of my screen, not the very first option.


You will see a blue button that says 'free.'  (Mine is green because I've already installed it). Click on it and install onetab.


Once you've installed it, a little blue icon will always be in the top right of your chrome browser.


Next, open up all the sites, docs, forms, activities, etc that you want students to have open and use during one lesson. Hit the little blue icon that you now have in your browser, and watch all the tabs collapse into one!


You will notice above the list of links are some other links that say 'restore all, delete all, share as webpage and more.' Click on 'share as web page.'


This will open a new tab. If you select and copy this webpage address (www.one-tab.com/page/w2...etc...) you can put it in an email to students, somewhere on your site, or however you share work with students. Notice also that you could share it as a QR code! Handy :) 


I hope you find this as useful as I did. It's saved so much time in so many lessons!