Thursday 16 July 2015

What Teachers Do In Their Holidays


Day 1 of holidays (Saturday): in at uni to work on my honours dissertation.


Day 2 of holidays (Sunday): Nice early start to head down to Wellington for the BioLiveChemEd 2015 conference that begins this evening. 


Day 3 of holidays (Monday): 9am keynote lecture at the conference at Victoria University.


Day 3 of holidays, mid morning (Monday): a seminar on the post-tea-house model of teaching. Couldn't get internet access AGAIN so posted all my notes through my phone onto twitter (see below):


Day 3 of holidays, afternoon (Monday): in the lab to learn how to get the most out of a heart dissection. I was reminded of what it feels like to be a student - I couldn't hold the names of the parts of the heart in my head, so had to take a picture on my phone and then went about labelling them using a photo editing app in my phone. It helped to clarify what was what, and also reminded me that students probably also need to do, use or create something with new information.


Still day 3 of holidays (Monday): Conference dinner and scientists version of dinner fun - making a fantasy molecule from marshmallows and toothpicks. Behold: a hypervalent butterflyne!


Day 4 of holidays (Tuesday): More workshops and tutorials, managed to win a 'mystery prize' from guessing the answer to a question. 


Day 4 of holidays, mid morning (Tuesday): keynote lecture from Dr Siouxsie Wiles. I was a bit of a fan-girl and went to get a picture with her afterwards. I learned that antibiotic resistance is spreading and 'superbugs' are found in every country of the world now, including New Zealand. The World Health Organisation predicts that within 10 years routine surgery or even cutting your finger could become life-threatening again because of a lack of effective antibiotics, as the bacteria evolve to resist them. Dr Wiles wants to start a 'Shroom Club, where citizens collect fungi from around NZ and send them to her lab to be tested for their potential use as new antibiotics or vaccines, using bioluminescent transgenic bacteria (like tuberculosis, skin infections or food poisoning) to screen them.


Day 4 of holidays (Tuesday): biochemical keynote on molecules that mimic other molecules and bind to the chemicals receptor, making your body think there's a higher concentration of those molecules. What I took away from this is that touching receipts causes oestrogen-mimicking molecules to be absorbed straight through the skin on our fingers (not great), and that these can also pass easily through the placenta of a pregnant woman to her unborn child. And this might be one of the factors affecting early onset puberty in girls.


Day 5 of holidays (Wednesday): Workshop run by Benjamin Himme on some cool new digital tools and teachery tricks, like Kaizena (a google docs add-on that lets you record verbal feedback snippets rather than typing) and using Planboard rather than google calendar because you can shift whole lines of lessons that run overtime, or if something unexpected pops up.


Day 5 of holidays (Wednesday): end of conference, once again couldn't get internet access in the main hall, forgot how difficult I find concentrating while handwriting notes. These ARE actually notes. The main thing I took away from this was about the Information Processing Model, which says that students (and people in general) can't hold more than 7 (plus or minus 2) bits of information in their working memory for long, so practice or exam questions or activities with more than 7 steps causes a huge drop in achievement...


Day 6 of holidays (Thursday): straight into designing a website for Y13's final external and trying to wrap my head around millions of years of human evolution before I teach it. Being a first year Biology teacher means I have to re-learn a lot of content from 8 years ago!


Day 7 of holidays (Friday): When your flatmate has her day off from work and gets to chill but you're still working. At least there's someone to talk to.


Day 8 and 9 of holidays: NOT WORKING. Having weekend. Very good.


Day 10 of holidays (Monday): In at school for a day of work, providing students a quiet place to work on whatever they felt like. I didn't help them or push them too much because I was still trying to sort out human evolution, but I was there when they asked questions so that was good.


Day 11 of holidays (Tuesday): working on year 12 external. Forgot photo.
Day 12 of holidays (Wednesday): working on year 12 internal. Forgot photo.


Day 13 of holidays (Thursday): Spent the morning at home working on the last year 13 internal, and then back in to uni in the afternoon to meet with my supervisor and fix up my ethics proposal. My brain was pretty tired by the time I took this pic.


Day 14 of holidays (Friday): While I have been working on overall unit plans, coming to terms with assessment standards and studying content, I realised I don't have anything concrete actually planned for Monday. Hence this face.


Day 15 and 16 of holidays: NOT WORKING!

Thursday 25 June 2015

How to Create Stop Motions by Phoenix

Stop Motion Animations - How to create Stop Motion Animations 
(This guide was created for Miss wells upon request)


Requirements:
  • A chromebook
  • Play-doh or whatever you are using to create,
  • Patience,
  • Listen to the teacher, Use your ears, that's why they exist
  • Use your eyes, use your brain. Common sense.
  • Google Presentation


What you have to do:

1)
Get your laptop out and everything you need.
This shouldn’t take long
2)
Open the ‘Camera’ App (It’s bundled on every chromebook) ...Something like this:
Screenshot 2015-06-26 at 09.29.18.png
3)
Adjust your laptop so your play-doh creation is going to be in the middle of the picture

4)
Keep hitting spacebar to take pictures and move your playdoh around just a little, make sure it’s different each frame.

Screenshot 2015-06-26 at 12.05.57.png
Or hit this button
5)
When you’ve finished click here, on the bottom left
Screenshot 2015-06-26 at 12.42.49.png
6)
Click on one picture you took
Screenshot 2015-06-26 at 12.46.05.png
7)
Click this button, Save to disk
Screenshot 2015-06-26 at 12.46.53.png
8)
Hit save (It’s easier to also just create a folder depending on how many shots you take)
Screenshot 2015-06-26 at 12.48.51.png
9)
Repeat Step 7 and 8 for the rest of your shots
You can’t multi select, I tried that already many times...Unless you know how to do so then go ahead.
10)
Get it ready to insert into your Google Presentation by clicking Insert then Image and choosing it from the folder you made.


FAQ:
- No, you can’t multi-select to save Photos, I tried that already, unless you know how then go ahead…


Tamaki College
9PEm (Migrated)


(C) Phoenix L (phoenix2dcr9sz@tamaki.ac.nz)

Tuesday 26 May 2015

Momentum - Beautiful and Organised

I went along to a toolkit run by the lovely +Noelene Dunn and Jason Sharma a few weeks ago, and the best thing that I learned about was a fantastic Google extension called 'Momentum.'

Momentum is a super-simple daily organiser and beautiful wallpaper for any newly opened tabs in your chrome browser. 

I love the beautiful, calming background images and the easy-to-use list of things to do. It is extremely satisfying crossing tasks out and deleting them from the list! Even the simple fact that it greets me by my name brightens my morning :) 

This post is about how to set up your computer with Momentum!


First, go to the chrome store:


Search for momentum, it looks like this (about fourth down the page):


Walk through the simple instructions to set up your name and where you live. 


Each day has a different beautiful picture, quote, and you will be asked what 'your focus' is for the day every day :) 


Down the bottom right are the words 'To Do'. Click this to enter your to do list!


When you are done with a task, click the white box and a line will appear through it (ahhh, so satisfying... if you are like me then you probably break down tasks into smaller ones just so you can tick more of these boxes!)


To delete the completed task from the list click the little x to the right of it.


And there you go! 

Now you are guaranteed to have at least one thing happy to see you each morning, asking how you are and reminding you of all the many and varied things you need to do.    :P 

Tuesday 24 February 2015

Zaption Woo-hoo!


Great new tool discovered for making Youtube videos more interactive. Their tagline is "don't just watch. Learn." Who are they? zaption.com

Get started and create an account using your Google login or a different one.

The video tour that pops up is actually really useful so watch it and learn!

Once you are through the tour then you'll be ready to start creating.


Click on New Tour.


Add a video; you can upload or insert a link from youtube.


Trim the beginning and end by clicking on the little scissor snip tool.


The way you do this is by dragging the blue circle (not orange triangle) to where you want to trim and then press save.


Play the video and decide where you could pause for a question!


Questions come in many forms - the opportunity to write a short answer, pick a multi choice or check boxes to tick. While writing short answers may help students achieve deeper learning, once they submit their answer there is no way to see what they have written without paying for the upgrade of zaption. 

I've tried to get around this by asking students to screenshot what they write if it's a short answer question and screenshotting whether their answers were correct or incorrect if it is multi choice or checkboxes!


Drag the style of question you want onto the video. Click on the boxes to write the question and provide options for multi choice or checkbox questions.


Select which answer is correct or incorrect by clicking on the little orange +'s. You can also write why the answer is correct or incorrect, which students will see depending on what they wrote.

Again, if you pay for the upgrade there is a great option to send students back to a certain part of the video if they pick an incorrect option.


Once your zaption video tour is complete and full of questions, click publish! 


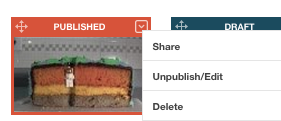
When it's published it looks like this. Now.. how to share?!


Click the little dropdown arrow and select share.


You can add a link by copying the link, or embed the iframe code in an embed gadget on your site, so students can complete the zaption tour without leaving your class site.

If you don't know how to use an embed gadget and modify the size to suit the iframe width and height then you may have to search for one of my previous blog posts.


Happy zapping :) 


Monday 26 January 2015

A Reminder To Self: Useful Sites and Tools

Online Tools for Education

This post is about some of the online tools that I found useful last year...
I wanted to describe them all in one place (with links) so I could return at a later date if I was ever stuck for a way to make learning online more creative for my students.  
Most of these tools are easy to use, and could just as easily be used by students. They could create something for themselves, or something to share with their peers (or wider audience) based on what they have learned. 
I'm sure that I have missed a lot of great tools! It would be really helpful if anyone could post sites that I have missed in the comments section below to help build up an even bigger inventory of resources to share. 

VOCAROO - Uneditted voice recordings. Could be used to remind students about homework and school events etc. A quick and easy way to communicate with students at home. Gives you an embed code to put on your site or blog.
PADLET - A virtual post-it wall. Create a padlet, double-click to make a posting with instructions or an example. This can also give you an embed code to insert into your site, and students can interact with it without leaving your site.
INSTA-GROK – good for gathering information. Type in a question and it displays information as an interactive spiderweb. Hover mouse over it to see information expanded. You can adjust the slider at the top from “brand new” to “expert” to change the complexity of the information displayed. I personally find this confusing but other learners may enjoy the links and visual nature of the spiderweb.
THINGLINK – is extremely simple. Use any image from the web and add interactive links to it that will lead students off on an adventure of their choosing. Provides an embed code for your site as well.
LINOIT - similar to padlet but you have more control over the background colour. Doesn't appear to have any embed codes available.
WIKISPACES - you may have to fully commit to wikispaces as your organisational platform (like EDMODO) so students know to regularly return to it. Or just use it for a short time to run and monitor a discussion.
GO!ANIMATE – used to make little animated videos or moving comic strips. I would now only use this for a short home-learning summary task as it can be quite an involved and time-consuming process.
ABCYA ANIMATE - similar to the old Paint with brushes and pencils of varying size and colour. The tutorial is clear. It is easy to draw with and change. You can't change the speed of presentation of the animation and you can't embed it but you can export the final product as a gif and then upload it.
LEARNIST – this site was a little tricky to get into. You can create a 'board' and then add up to 5 articles, videos, or images, along with a heading and description for each. You need to add them one at a time, finish writing everything, and then the final step is to rearrange everything into the order you want students to meet the information. There is an embed code but it doesn't appear to work in my site; instead you could share it on Google+.
PINTEREST - create 'boards' for concepts and search for 'pins' to add to it. Easy to collate ideas in one place. Can't embed it but can share it in other ways. 
SCOOP IT – similar to learnist but looks more like a facebook feed. You can collect and collate videos and articles, and write a description for each one much the same as learnist. However I think it would be quite nice if students could intersperse these with posts of their reflections on each one, kind of like 'status updates' on Facebook.
EDUCREATIONS – started as a digital whiteboard but has since been upgraded. Register as a teacher, set up a class, get a code and start to create lessons. Insert a picture while annotating it and talking, and it saves it as a video.
EDMODO – learning community that looks like Facebook. Access to the class is code protected, and because it is like Facebook it is pretty quick and easy to use. It has folders to drop work into, powerpoints, and you can import from learnit and scoopit etc. Useful for handing in work and marking online, especially for setting deadlines with shutoffs. You can also run quizzes and polls through it.
PEERWISE – this site is run by the University of Auckland. Log in, create a class, and invite students to join by importing their emails from KAMAR or teacher dashboard. IT IS AWESOME! Students create multiple choice questions, answer their peers questions, and can also provide their peers feedback on the difficulty or accuracy of their questions. They earn badges by asking and answering more questions, or providing more feedback.
PREZI – like a cool, moving powerpoint online. Easy to use and many students have experience with it before. You can also easily embed these onto your sites.
DVOLVER MOVIEMAKER - the easiest site for animations, as it has turned the process into 6 multi-choice steps, e.g. choose the background, choose the character, type some text.. No ability to embed or share though, aside from email. Therefore may just be good as a home-learning task or exit ticket.

SOCRATIVE - log in as a teacher to create a quiz, ask a quick question, make an exit ticket or have a SPACE RACE! I like the space race because when students log into the room they are randomly assigned to a team with others in the class. Then students answer the questions you have created, and whenever they get them right they help their teams' space rocket to blast closer to the finish line!

ACTIVELY LEARN - a close reading tool. Log in, create a class and walk through some very clear tutorials. Then chose some readings, set a task or set an assignment. You can search through content (short articles, longer stories, etc) and when you find ones that you like you can send them to your 'workspace.' Sometimes articles that you select will have assignments attached to them that other teachers have created for it, and you can look through them and select one of them too if you'd like. Once it's in your workspace you can add questions (multi-choice or short answer) for students to answer as an assignment. You can also choose whether to attach multimedia to your assignment.

QUIZLET - online flashcards! And not only that, you can create classes, get students to log in and then keep track of the high scores for two games at the end of the quizlet. Students need to learn the words and definitions to get a really good score. The leaderboard is public within your class, so students can see what their friends are scoring. Can get quite competitive and many students have gone home to continue playing.

KAHOOT - click this link to be taken to the teacher login where you can create your own quiz (or select from existing ones). You will need to go to kahoot.it when you want your class to play. This is fantastic for revision and students appear to love it! I wonder if it also has something to do with the dramatic background music while they're playing, and the public scoreboards again at the end of each question.

INFOGR.AM - helps you to create infographics using templates. Only appears to give you 5 templates with identical layout, just different colours. You need to adjust the graphs using your own data. Good if you have 1 set of data or 1 graph you want students to present and explain. Probably better for maths or science than anything else.

PIKTOCHART - I love piktochart. It's very intuitive to use and has a whole lot of different templates (infographic, report, chart and presentation), and if you scroll down there are so many themes within them to chose from. After that, just double click to alter or delete any of the text or images, and drag and drop new ones. Great for student creations.

CANVA - similar to piktochart and just as intuitive. Canva has images that you need to pay to download though, although you can still add them to your poster or infographic (they will just have faint lines and the word Canva across them).

MOVENOTE - links really well with all of our Googly docs and presentations. Open movenote, select which docs or slides you want to talk about, then press record. It will film you talking (so students can see your face) as you click through the different things. It will also show where your mouse is so you can circle around what you're talking about. However it appears to only be shareable via Gmail, not embedded anywhere.

QR READER - downloaded onto phones.. it can be fun to send students on a mission to find and scan different QR codes. This app was being used a lot in Pt England school last year, with the 5 year old iPad class!

COOL TEXT - great for making buttons for your site and simple to use; select the font style that you want, type what you want on the button, and screenshot!

POWTOON - presentations or animation videos. Free signup. Not too bad to manipulate, much simpler than GoAnimate! and it provides an embed code for sites.

PICMONKEY - upload a photo or screenshot and then add text (great fonts) or little images such as blog critters or ladybugs.. I use this to make pretty buttons for my sites.