Sometimes I need to quickly push work out to students, and there are two ways I know to do this (aside from having it available on class sites).
The first is to use the 'Smart Copy' on Teacher Dashboard, and the second is to create a group on Gmail. I only just learned how to do the second, so I thought I'd make this post!
In Teacher Dashboard each year level is called a 'Class.' Unfortunately, I teach three different year 9 classes who are in the same year level, and they are all mashed together in Teacher Dashboard as one huge year 9 'Class.'
This meant I had to separate the giant Year 9 'Class' into their actual classes by assigning each their own colour. You can do this by clicking on the squares next to students' names and giving them a colour. PLa is blue for me, PTt is yellow and RTd is orange. You will need to do this too before you can send a smart-copy to each class individually, or if you are lucky, you may just have 1 class per year level!

When you're done you'll be able to use smart copy and send it to just one class. The 'smart copy' button is that tiny little button on the left hand side under 'Dashboard.' It looks like two teeny, tiny bits of paper. Click on it.

Once you click on it, this will pop up. If you have the work to push out then select 'use an existing document,' and then select which doc (or form, or spreadsheet, or drawing, or presentation) you want.

Find the document that you want to share. Select it.

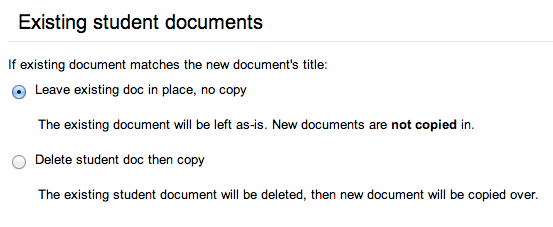
Choose what kind of sharing you want to do. If you select to 'copy' then each student will get a copy of the doc in their own folder, ready to use.

Next up is a neat option to add the students' name to their doc; all you have to do is type %F at the start of the document name, and it will automatically put their own name in the title in their folder! Smart :)

Ahh, finally, now we are up to the stage of selecting which students to share the document with. I have to select by group, or else the work will go to all three of my Year 9 classes, who are all quite different and work at different speeds. You might be able to just share with a class, if you only have 1 in each year level.

Make your last selection, and then you will be able to share it!
The other way that I just found to do this is to create a group in Gmail. This is handy in case you quickly need to contact a class as well; to remind them about homework, to arrange a catch-up session, for notices about permission slips, or share work etc etc.
In gmail, click on 'Mail' and select 'contacts.'

Once you arrive at the new screen click on the button with a little person with a + next to them, and begin typing the names or emails of all the people you want to add to the mailing group. The names and emails will automatically separate, and you can add more than one person at a time.

Once you have everyone you want, click 'add.' These people will now show up in your list of contacts below.

Scroll through the list and tick the names of everyone you just added, then return to the top of the screen to where there is a little group of people. Click on that and from the drop-down menu click on 'create new.'

Type the name of the new group.

Don't forget to click on 'apply' or no one will be added to your new group.
Now, when you want to send an email to a group of people you can just type the name of the group, rather than add their names individually.


