Showing posts with label Youtube. Show all posts

Tuesday, 24 February 2015

Zaption Woo-hoo!


Great new tool discovered for making Youtube videos more interactive. Their tagline is "don't just watch. Learn." Who are they? zaption.com

Get started and create an account using your Google login or a different one.

The video tour that pops up is actually really useful so watch it and learn!

Once you are through the tour then you'll be ready to start creating.


Click on New Tour.


Add a video; you can upload or insert a link from youtube.


Trim the beginning and end by clicking on the little scissor snip tool.


The way you do this is by dragging the blue circle (not orange triangle) to where you want to trim and then press save.


Play the video and decide where you could pause for a question!


Questions come in many forms - the opportunity to write a short answer, pick a multi choice or check boxes to tick. While writing short answers may help students achieve deeper learning, once they submit their answer there is no way to see what they have written without paying for the upgrade of zaption. 

I've tried to get around this by asking students to screenshot what they write if it's a short answer question and screenshotting whether their answers were correct or incorrect if it is multi choice or checkboxes!


Drag the style of question you want onto the video. Click on the boxes to write the question and provide options for multi choice or checkbox questions.


Select which answer is correct or incorrect by clicking on the little orange +'s. You can also write why the answer is correct or incorrect, which students will see depending on what they wrote.

Again, if you pay for the upgrade there is a great option to send students back to a certain part of the video if they pick an incorrect option.


Once your zaption video tour is complete and full of questions, click publish! 


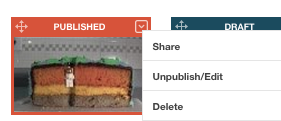
When it's published it looks like this. Now.. how to share?!


Click the little dropdown arrow and select share.


You can add a link by copying the link, or embed the iframe code in an embed gadget on your site, so students can complete the zaption tour without leaving your class site.

If you don't know how to use an embed gadget and modify the size to suit the iframe width and height then you may have to search for one of my previous blog posts.


Happy zapping :) 


Friday, 30 May 2014

Using Youtube to Create and Edit Videos

Youtube - not just a place to watch videos about how to communicate with giraffes or watching Koko the Gorilla bonding with kittens... This blog post is all about how to create and edit a movie using only youtube! 

First of all you need to upload videos to youtube. You can do this by clicking the 'Upload' button and recording direct from your webcam, or selecting files already on your device to upload. 


Another way to upload videos is to email them to your youtube. This is particularly useful because most people have cameras on their phone. Students doing group projects can film multiple angles at the same time and then send them to the same youtube account for combining and editing. To find out the email of your youtube account, first click on your youtube user - mine is wells@tamaki.ac.nz. A menu will open. 


Click on youtube settings and you will be taken to this page. You will see next to 'Mobile Uploads' an email xxxxxxxx@m.youtube.com. Once your students have finished editing and published the videos you can change this email by pressing 'Click here.' 


Right, now all your videos have been filmed or uploaded you'll want to edit them. Click on your account name again to open the menu. This time click on 'Video Manager.' 


On the left hand side of the screen you will see a menu for 'Video Manager.' Click on 'Creation Tools.' 


You will be taken to a page called 'Audio Library.' This contains all the music that is free for you to use when making your video. It's too early to worry about that though. First of all you need to get your actual video looking good, before you start to think about adding music or sound effects. 


Under creation tools select 'Video Editor.' 


You will be taken to a screen that looks like this, except where it ays "no videos were found" there will be all the videos that you have filmed and uploaded. Pick which one you would like to edit, then drag and drop it into the row next to the film camera. 


There are other features available to you as well.  One of those is found under the creative commons (the logo with CC inside a circle).  These are videos free for you to use!  You can drag and drop any of them into your video. 


The other options are to add photos, add sound, change the transitions between scenes and to add text. 

Once you have added everything that you want, you can start chopping them up and adding extra effects to the individual segments. To cut a segment in half click on the segment and click on the scissors. Then move the blue bar to where you want to cut, and click your mouse just once. 


Next you can add effects to the different segments you have created. Click on the segment in your bar and this white section will pop up, allowing you to add filters to the segment (just like Instagram), text, sound effects, slow it down, change the brightness, and stabilise it (useful for steadying videos filmed on shaky camera phones). 


 Once you have a finished product that you are happy with, click 'Publish' in the top right hand corner. Check the sharing settings are what you want. Below I have included a screencast saying everything I have just written (for those of you who are visual learners). 


How to Make a Screencast

This is how to make a screencast on a Mac using Quicktime because Quicktime is free! Screencasts record the movements on your computer screen and can also optionally record your face, your voice and the sound of your clicks. Screencasts are great for creating how-to instructional videos for your students - how many times have you explained how to create a new doc? Or search on Google? Or tried to explain to your Aunty over the phone how to find a lost email draft??

Create a screencast and just send them the link!


The first thing you need to do is to find the Quicktime player using Spotlight in the top right hand corner. 


You will click to open Quicktime and may be confused because nothing obvious appears to happen. However all that happens when you open Quicktime on a Mac is the bar at the very top of the screen will change to show Quicktime player.


Click on File and select which type of recording you want. Movie Recording will include film from your webcam. Audio is just sound. To screencast without your face select New Screen Recording.


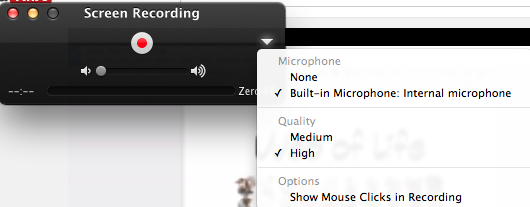
This box will open. Click on the little downward facing arrow to check the settings before recording.


To screencast without sound select None for Microphone, for sound select Built In Microphone. If you want your clicks to be particularly obvious select Show Mouse Clicks in Recording. 


Once your settings are sorted you can click the red record button. You will get the option of clicking (to record your entire screen) or you can drag and select a smaller area. Perhaps you do not want all of your tabs visible? 


Now you are ready to record. Have all the tabs that you are going to talk about/show/move between already open because nobody wants to watch a loading screen. Just flick between them in your tabs instead - much faster and cleaner! Once you have finished recording press the stop square and a preview of your screencast will pop up, with this black box on it: 


To publish your screencast select the tiny right-facing arrow on the right hand side of the black box, and select Youtube.


Log into your youtube account, and the video will upload to it! 


Have fun creating screencasts :)