Showing posts with label Learning. Show all posts

Tuesday, 24 February 2015

Zaption Woo-hoo!


Great new tool discovered for making Youtube videos more interactive. Their tagline is "don't just watch. Learn." Who are they? zaption.com

Get started and create an account using your Google login or a different one.

The video tour that pops up is actually really useful so watch it and learn!

Once you are through the tour then you'll be ready to start creating.


Click on New Tour.


Add a video; you can upload or insert a link from youtube.


Trim the beginning and end by clicking on the little scissor snip tool.


The way you do this is by dragging the blue circle (not orange triangle) to where you want to trim and then press save.


Play the video and decide where you could pause for a question!


Questions come in many forms - the opportunity to write a short answer, pick a multi choice or check boxes to tick. While writing short answers may help students achieve deeper learning, once they submit their answer there is no way to see what they have written without paying for the upgrade of zaption. 

I've tried to get around this by asking students to screenshot what they write if it's a short answer question and screenshotting whether their answers were correct or incorrect if it is multi choice or checkboxes!


Drag the style of question you want onto the video. Click on the boxes to write the question and provide options for multi choice or checkbox questions.


Select which answer is correct or incorrect by clicking on the little orange +'s. You can also write why the answer is correct or incorrect, which students will see depending on what they wrote.

Again, if you pay for the upgrade there is a great option to send students back to a certain part of the video if they pick an incorrect option.


Once your zaption video tour is complete and full of questions, click publish! 


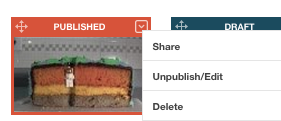
When it's published it looks like this. Now.. how to share?!


Click the little dropdown arrow and select share.


You can add a link by copying the link, or embed the iframe code in an embed gadget on your site, so students can complete the zaption tour without leaving your class site.

If you don't know how to use an embed gadget and modify the size to suit the iframe width and height then you may have to search for one of my previous blog posts.


Happy zapping :) 


Friday, 30 May 2014

Using Youtube to Create and Edit Videos

Youtube - not just a place to watch videos about how to communicate with giraffes or watching Koko the Gorilla bonding with kittens... This blog post is all about how to create and edit a movie using only youtube! 

First of all you need to upload videos to youtube. You can do this by clicking the 'Upload' button and recording direct from your webcam, or selecting files already on your device to upload. 


Another way to upload videos is to email them to your youtube. This is particularly useful because most people have cameras on their phone. Students doing group projects can film multiple angles at the same time and then send them to the same youtube account for combining and editing. To find out the email of your youtube account, first click on your youtube user - mine is wells@tamaki.ac.nz. A menu will open. 


Click on youtube settings and you will be taken to this page. You will see next to 'Mobile Uploads' an email xxxxxxxx@m.youtube.com. Once your students have finished editing and published the videos you can change this email by pressing 'Click here.' 


Right, now all your videos have been filmed or uploaded you'll want to edit them. Click on your account name again to open the menu. This time click on 'Video Manager.' 


On the left hand side of the screen you will see a menu for 'Video Manager.' Click on 'Creation Tools.' 


You will be taken to a page called 'Audio Library.' This contains all the music that is free for you to use when making your video. It's too early to worry about that though. First of all you need to get your actual video looking good, before you start to think about adding music or sound effects. 


Under creation tools select 'Video Editor.' 


You will be taken to a screen that looks like this, except where it ays "no videos were found" there will be all the videos that you have filmed and uploaded. Pick which one you would like to edit, then drag and drop it into the row next to the film camera. 


There are other features available to you as well.  One of those is found under the creative commons (the logo with CC inside a circle).  These are videos free for you to use!  You can drag and drop any of them into your video. 


The other options are to add photos, add sound, change the transitions between scenes and to add text. 

Once you have added everything that you want, you can start chopping them up and adding extra effects to the individual segments. To cut a segment in half click on the segment and click on the scissors. Then move the blue bar to where you want to cut, and click your mouse just once. 


Next you can add effects to the different segments you have created. Click on the segment in your bar and this white section will pop up, allowing you to add filters to the segment (just like Instagram), text, sound effects, slow it down, change the brightness, and stabilise it (useful for steadying videos filmed on shaky camera phones). 


 Once you have a finished product that you are happy with, click 'Publish' in the top right hand corner. Check the sharing settings are what you want. Below I have included a screencast saying everything I have just written (for those of you who are visual learners). 


Linking and Using Google Sites and Google Docs

Today in our MDTA training we learned how to make a screencast with sound.I chose to make my screencast about how I used Google Sites and Google Docs to help create an online, e-blended learning environment incorporating games, shared docs, videos, forms and spreadsheets, research on other sites, student reflections and the commenting feature on docs. My goal was for the doc to act as a learning log or folder for all of the students' working.

I was very excited about the site and doc but after a week I realised that it wasn't engaging the students as much as I had hoped. To add to this I was trialling the effect of 'learning' in class before moving on to the effects of 'creating.' The first week we used the doc was fairly content and online-activity heavy as I was trying to do the 'learning' in one block, leaving more time at the end of the unit for concentrated 'creating.' 

It quickly became clear that was not a great idea. Students NEED to do something with information. Passive learning - even if that passive learning involves online games and collaborative docs and competitive researching - is not as engaging for students.

I sought feedback from students on these tools for learning - they did not want to purely work online and in the doc all the time. Our conversations reminded me there is still a place for direct teaching and definitely a need for active and creative learning. 


I would use a doc like this again with a site, but I would make it more explicit to students that it is a record of their learning - a log. I would teach everyone how to take screenshots at the start of the unit. I would move slower through the online games and activities and ensure students write reflections beneath the screenshots of their learning. And I would get students to take photos of active learning activities and insert them into their docs with reflections too. Like a digital diary of their time in class. I think it would be even better if they could have a blog to share descriptions and explanations of their learning.

The link to my site is here.
x

Making a Stop-Start Animation

This week at the MDTA training session we learned how to make stop-start animations. They were so much fun that we all voluntarily gave up our lunch breaks to keep working on them! I imagine students would be equally engaged by making these cool creations...


Here's how you make them from woe (oh gosh it seems like so much work) to GO (step back and watch the magic happen)!


I suggest students have a story-boarding session where they write a script to keep them on track during the photography. That way their story will have direction and include the content you want to review. 


Find a well lit wall of the room and set up a backdrop and a foreground. Blu-tak them down to make sure they don't shift too much. 

I used a scene from a calendar, but a plain sheet of A3 works just as well. If you were going to regularly make animations you might consider having a cardboard set constantly at the ready, with a couple of props like trees... Students could also find a wallpaper online and print it, or draw one themselves. 


Set up the camera. Try to keep it as steady and still as possible. 

I used an old digital camera with a flat base and blu-tak'd the camera in place as well. A tripod for a phone can work. Students can use their netbooks by pulling a chair up to the desk and adding a booster (old phone books work well) so the camera in their netbook is at the right height. 


Blu-tak the character's feet, make them do tiny movements, take a LOT of photos. 

Blu-taking the characters feet makes sure they don't move until you want them to. Have one student moving the characters and telling another student when to take photos. The student taking the photos can position themselves under the desk, ready to click away. 


What happens if I bump the camera out of position or my character falls over?

Change camera angles. That way you won't notice the big jump in continuity and it keeps the footage interesting. Think about changing camera angles anyway if it adds to the story; high angles, low angles, over-the-shoulder shots, close ups... 


Once you have taken all the photos to tell your story, import them to your device. 

Open iPhoto. You can find this by searching in the top right of your Mac  


Import the photos into iPhoto


Open iMovie. There are now some things you need to do before you can drag your photos in from iPhoto. 


Create a new project and change the properties.

If you just drag and drop the photos from iPhoto, each photo will get it's own transition. This will ruin your animation. To avoid this you need to create a new project. 


Right click on the project and select 'Project Properties...'


Change the Initial Photo Placement from Ken Burns (the annoying transitions) to Fit in Frame.


Open your New Project and drag in your photos. If you watch your animation now you will notice it is quite slow, and you will probably want to speed it up...


Click on one of the photos and Command+Shift+A to select them all.  Hover your mouse over one of the photos and you will notice a little cog pop up with a number just above it. Click on the cog and this box will open.


Select 'Clip Adjustments' and change the 'Duration.' I wanted my photos to flick over fairly quickly, so I selected 0.2s. 

If you want some sections of your animation to flick over more slowly, select only the pictures you want to change the speed of (not all) and then deselect (untick) the box that says 'Applies to All Stills.' 


Adding sound to your animation.

Once I was happy with the speed of my animation I used my digital camera to film it playing. Then I opened Garage Band and created a New Project


I selected Vocals and then got ready to voice my animation while playing the animation on my digital camera. This was so I could see the animation while I was talking, to try and get the timing right. I hit the little red circle to begin and end the recording. 


Then I switched back to iMovie and clicked on the little music note on the right. I selected GarageBand and chose the name of my recording. Then I could drag and drop it into my animation. 


Other people who made their animations used the recording feature in iMovie, which is probably easier. However if you do this you can only record sound to the length of the animation and nothing beyond it. 

You can also add iMovie Sound Effects to your animation.


Publishing your finished animation.

Once you are happy with the look and sound of your animation, click on Share and publish it to youtube. You will need a youtube account to do this.


Now you can share your animation to friends and family far and wide, or publish it for the public :)