Thursday, 11 September 2014

Students Becoming the Teacher

Yesterday at the end of 9PLa's Science class Gustavo and Rongo showed me how to make a gif from a youtube video.  

Rongo had been using the gif as the background of a Google Presentation, and it looked really, really cool! 

I asked the boys if they could make a set of instructions to share how to do this, so here they are:


HOW TO MAKE A GIF - BY GUSTAVO


Step 1.

Find a video on YouTube that you would like to convert into a gif.

Screenshot 2014-09-11 at 8.38.05 PM.png


Step 2.

Insert these three letters (gif) after the www. in the URL

Screenshot 2014-09-11 at 12.34.06 PM.png


Step 3.

Pick a start time on the video for the gif you are creating

Screenshot 2014-09-11 at 8.46.58 PM.png

LIke this:

Screenshot 2014-09-11 at 8.51.05 PM.png


Step 4.

Set a time duration for your video.

Screenshot 2014-09-11 at 8.53.08 PM.png


Step 5.

Create gif.


Outcome:

Fresh gwuac.gif


Saturday, 30 August 2014

Website Layout Success But Problems Embedding Prezis

I've just finished wrestling with a new website for the Year 11 Ecosystems topic that is beginning in a weeks time. After about 4 full weekend days of creating resources, uploading, fiddling with annoying layout issues and creating buttons that are at least a similar size to one another I'm finally happy with how it looks


Along the way I discovered that I don't know how to embed Prezi presentations, so to get around that I tried using Quicktime screen recordings and publishing them through iMovie and Youtube. It worked fairly well (but took a while), and another limitation is that students will need to pause the video if they want to read slower or read again, rather than clicking through a Prezi at their own speed. 

If someone knows how to embed a Prezi then I would be very happy to find out! 

I also found out that you can put tables within tables to help with the layout, and also how important it is to not turn the tables invisible until you're completely done with moving them around.

To make buttons of a similar size I created a background pattern using colorlovers, took a screenshot that was the size of the button I wanted, and then added text to that screenshot in picmonkey. It's taken me about 5 different websites to realise that if I just take a small (button-sized) original screenshot from colorlovers, then I can just take a screenshot of that full size when I'm finished in picmonkey, rather than guessing at how large I should drag the final screenshot.

Now I'm looking forward to seeing how the Year 11's react to the site and the work!

Monday, 11 August 2014

New Tools, Games... Music? in Class

For the last two days I've been experimenting with some different tools and ideas that I haven't regularly used before.


The first was Class Dojo, and it appears to be a hit!  Students compete with each other to earn the different Dojo Points - Starting the Do Now, Working Hard, Helping Others, or being On Task.  Now that I have set up classes online I can wander around holding my cellphone, awarding students points for great work.


 I know that I need to DO something with those points soon though! I have a store of prizes in my office that I need to find time to wrap in newspaper - perhaps the person with the most points each week can do a lucky dip prize draw on Friday! I think it might be a good idea to reset the points at the end of each week and give everyone a clean slate and even footing again, ready for a new week of hard work.


Today I also trialled Socrative Space Race. The first thing I had to do was sign up with school email and create my own quiz questions. Then I could choose whether to run the quiz as Quiz, Quick Question, Space Race or Exit Ticket.

If you select Space Race, you get to choose how many teams you want the students to be randomly assigned into. Socrative gives you a room number (my Chemistry Quiz is in Room 688040, as you can see below).  When students come to play all they need to do is enter that room number and wait for the teacher to click 'Start Activity' once everyone is ready. Then they enter their names and answer questions correctly to help their space ship blast as far as they can!


Something else I have been trying a little is using music in class.  Last week I played 2 minutes of Pharrell's song "Happy" while one of my classes packed up after a messy Elephants Toothpaste experiment. Before the music came on they were dragging their feet a little, but with the upbeat song playing, clean-up became a breeze! I will definitely play music during pack-up again, but I need to make sure the lyrics are clean and wholesome! Perhaps this can be a weekend project for me, compiling a list of usable, upbeat songs for clean-up time.

In a similar vein, today with one of my classes I played Motzart during the Do Now. I think that it settled them some, but I need to repeat this experiment and observe the outcome again!  Some students requested we let the song play on beyond the Do Now, others didn't enjoy it as much. 


I also had a go using movement to help another class remember a concept they have been struggling with; the difference between reactants and products. I got this idea from observing a wonderful maths teacher in my school - she taught her class a rhyme with actions to help her them remember a division concept!

We constructed a rhyme together - "reactants are ingredients you need at the start, products are what you see at the end, made of new parts" (we toyed with the lyrics "like a piece of art," but decided it wasn't as good) - and then I made up a few actions to go with the lyrics.  As we practiced it together some moves were altered (my original action for "new parts" was not specific or cool enough to start with) and I gradually rubbed words off the board until everyone could remember the actions and rhyme without reading the words.

After a few rounds of this I thought we had finished so I went to move on to the next activity when a student said "we should try it without you Miss," which I thought was a GREAT idea! So everyone did it one more time without me. We will see tomorrow whether this helped the class remember the difference between reactants and products! 


For some summarising activities recently I've been using Canva.com to create some really visually appealing (if I may say so myself) infographics. They are incredibly easy to make, by dragging and dropping different components and double-clicking on any text you want to change. By downloading or taking screenshots of the canva creations I've been able to put them into Google Drawings and add text boxes over the top for students to write their observations or summaries into.  Check out the image below to see how Caroline shared her understanding of Gas Tests:


The next step will be for students to create their own infographic, using either canva.com or infogr.am or piktochart.  I think I will try this with PLa first, as they all have working netbooks.  I could also envision maths teachers using infogr.am, and next year I would love to get some seniors to make summaries of biological concepts with Piktochart, perhaps like this one:


Sunday, 27 July 2014

How to Make Groups in Gmail

Sometimes I need to quickly push work out to students, and there are two ways I know to do this (aside from having it available on class sites). 

The first is to use the 'Smart Copy' on Teacher Dashboard, and the second is to create a group on Gmail. I only just learned how to do the second, so I thought I'd make this post!


In Teacher Dashboard each year level is called a 'Class.' Unfortunately, I teach three different year 9 classes who are in the same year level, and they are all mashed together in Teacher Dashboard as one huge year 9 'Class.' 

This meant I had to separate the giant Year 9 'Class' into their actual classes by assigning each their own colour. You can do this by clicking on the squares next to students' names and giving them a colour. PLa is blue for me, PTt is yellow and RTd is orange. You will need to do this too before you can send a smart-copy to each class individually, or if you are lucky, you may just have 1 class per year level!


When you're done you'll be able to use smart copy and send it to just one class.  The 'smart copy' button is that tiny little button on the left hand side under 'Dashboard.' It looks like two teeny, tiny bits of paper. Click on it. 


Once you click on it, this will pop up. If you have the work to push out then select 'use an existing document,' and then select which doc (or form, or spreadsheet, or drawing, or presentation) you want. 


Find the document that you want to share. Select it.


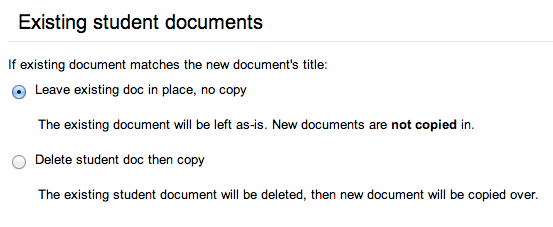
Choose what kind of sharing you want to do. If you select to 'copy' then each student will get a copy of the doc in their own folder, ready to use. 


Next up is a neat option to add the students' name to their doc; all you have to do is type %F at the start of the document name, and it will automatically put their own name in the title in their folder! Smart :)


Ahh, finally, now we are up to the stage of selecting which students to share the document with. I have to select by group, or else the work will go to all three of my Year 9 classes, who are all quite different and work at different speeds. You might be able to just share with a class, if you only have 1 in each year level. 


Make your last selection, and then you will be able to share it! 


The other way that I just found to do this is to create a group in Gmail. This is handy in case you quickly need to contact a class as well; to remind them about homework, to arrange a catch-up session, for notices about permission slips, or share work etc etc. 


In gmail, click on 'Mail' and select 'contacts.' 


Once you arrive at the new screen click on the button with a little person with a + next to them, and begin typing the names or emails of all the people you want to add to the mailing group. The names and emails will automatically separate, and you can add more than one person at a time. 


Once you have everyone you want, click 'add.' These people will now show up in your list of contacts below.


Scroll through the list and tick the names of everyone you just added, then return to the top of the screen to where there is a little group of people. Click on that and from the drop-down menu click on 'create new.' 


Type the name of the new group.


Don't forget to click on 'apply' or no one will be added to your new group. 


Now, when you want to send an email to a group of people you can just type the name of the group, rather than add their names individually. 


Thursday, 24 July 2014

Onetab from Google App Store

Here is a handy little app to add to your toolbar! 

If you are like me and you have spent tens of minutes in lessons trying to direct students to open the right activity, navigate to a quiz, and finding web pages, here is the app for you!

It is called onetab, and what it does is collate all the tabs you have open into one webpage. So all you have to do before a lesson is open up all the things you want students to have open during your lesson, hit onetab, and send them the link created!

Here's how to install and use it:


First, go to the chrome apps site, and click on the store icon.


Use the search box to find onetab.


It popped up at the bottom of my screen, not the very first option.


You will see a blue button that says 'free.'  (Mine is green because I've already installed it). Click on it and install onetab.


Once you've installed it, a little blue icon will always be in the top right of your chrome browser.


Next, open up all the sites, docs, forms, activities, etc that you want students to have open and use during one lesson. Hit the little blue icon that you now have in your browser, and watch all the tabs collapse into one!


You will notice above the list of links are some other links that say 'restore all, delete all, share as webpage and more.' Click on 'share as web page.'


This will open a new tab. If you select and copy this webpage address (www.one-tab.com/page/w2...etc...) you can put it in an email to students, somewhere on your site, or however you share work with students. Notice also that you could share it as a QR code! Handy :) 


I hope you find this as useful as I did. It's saved so much time in so many lessons!

Tuesday, 24 June 2014

Reflecting on MDTA

Last week we learned how to film and edit interviews. I worked with Greg from Tamaki Primary.

Here's the outcome, sorry it's a bit long!! I couldn't get it below 4 minutes.


Friday, 30 May 2014

Google Presentation Animations and How to Embed Them

Let me begin by saying that while I used Google Presentation to animate to the concept of balancing chemical equations and that teachers could also use it to illustrate concepts, it can also be used by students to create animations - of a story they read, of a scientific concept, of anything!

Click here to see a gorgeous example of this - the tale of two Pukekos at the Beach


First of all you need to actually create the animation. This will require a lot of copying and pasting of slides, because to get a smooth animation you need to move objects in the animation the tiniest amount between slides. 


You can see what I mean in the picture below, where the line in the middle of the slides is only slightly longer from one slide to the next. This will make the growth of the line smooth when the animation is played. 


Another thing to consider is the amount of time it will take people to read any text in your animation. Because the slides will flick very quickly during the animation, you may need to have the same information shown on 10, 15 or 20 slides. Just copy and paste the slide with words on it to give your viewers time to read.


Once you are happy with your animation you need click 'File' and then 'Publish it to the Web' 


This box will pop up.  There are a couple of things you need to do with this box.


First of all, change the 'Presentation Size' to Small. If you choose medium or large it may take too long to load on your site.


Next, change the speed of your presentation. 


Now there are some boxes for you to tick. These are important. Tick the box that says 'start slideshow as soon as the player loads.' This will make your animation automatically load and play when people come to your site. If you tick 'restart slideshow after the last slide' then the slideshow will just keep on playing over and over until your students hit the pause button.


Now you are ready to copy the 'embed code.' 


Go to your site and edit the page you want the animation on.  Click on 'insert' and click on '...more gadgets...' 


Search for the 'embed gadget' in the search box.  After you hit the search button the two options shown in the picture below will pop up.  Click on the second one - the 'embed gadget' one.


Select it.


An empty box will pop up. Paste in the embed code that you copied from the Google Presentation. It should look like the picture below after you have pasted it. 


You will notice in the code that it tells you the width and height of your animation. In this case, it is 480 and 299. 


You will also notice that the width and height of your embed gadget is already set at 400 and 400. This will not do, because it will cut off the sides of your animation and leave extra space below and above it.


 Change the width and height to match the animation.


Now this is the important bit! This changes your Google presentation into an animation. You need to change the time delay between slides. It is set at 1000, and that is just far too slow.


Change the time delay (false&delayms=) to somewhere between 300 and 700. I like 300. It is nice and fast. If your animation is flicking too quickly when you watch it though, you can come back and make this number bigger to make the gap between slides bigger. The other thing you could do is to reopen your Google Presentation and add more slides where you need longer to read things (just copy and paste the slides you want to show for longer). 


The last thing you need to do is scroll down and untick the two boxes that say 'include a border around the gadget' and 'display title on gadget.' This just makes the animation much tidier on your site. 


Once you save your page and go to view it, you should have a lovely animation to watch :) Check the timing is right and when you are happy, share it with your class! (Or if they are making it, get them to share it with you!!)


You can see my animation about balancing chemical equations here, or make a copy of it for your science site here.